LAST UPDATE : Dec 2021
***
I’ll try and explain in few steps what is needed in order to export your first track in AC. However, this is not intended to be an extensive tutorial; it’s only a listing of minimum requirements for your first drivable track. And should be simpler than it looks ")
General advices:
- According to the size of your project, building a track might take from an hour to a few months . It's up to you to set the limits. I will not say that it might be taking years, cause if it would.. you probably don't need this guide
. It's up to you to set the limits. I will not say that it might be taking years, cause if it would.. you probably don't need this guide - It would be a good idea to read this full guide at least once, before starting the actual work.
How to read this guide:
Normal text : basic information in order to succeed
this is usually a more detailed information about a certain topic. It is however "hidden" because you could skip it if you're not interested in finding out the whys right now
SOURCE original source for a specific info
TOOLS:
· Any 3D software package able to export in FBX 2012 format (e.g. 3ds max, Blender, ..)
· The AC Editor : http://steamdb.info/app/302530/
· *Optionally, an image editor if you’re planning to create your own textures (e.g. Photoshop, Gimp, …)
START YOUR PROJECT:
Before starting to model or do anything, I would recommend creating your folder structure.
While it's true you can also do this later, it's easier and cleaner to do it now. It only takes a few minutes and it could spare you of some problems later. See default tracks as example, which you can find in under assettocorsa\content\tracks.
A typical track (home made) will have the following structure:
these are restrictions for names of track- and car-folders, from x4fab and/or shared memory definitions:
max length for track (folder-)name: 32
max length for additional layout (folder-)name: 15
max length for car (folder-)name: 32
all lowercase, latin-digits-underscore, NO utf8- or fancy characters like é or something
\yourtrackname\
\ai\
this contains the information needed for the AI to be able to use your track. You should create it, and can be left empty. Track will work, AI will NOT work, obviously.
If however, you wish the AI at this point, see THIS thread on how to do it.
\data\
here you'll be able to define specific surfaces to be used in your track (should you wish so), edit the cameras, to define specific lightning, to define specific audio sources and more. Two possible scenarios:
1- If you are building a basic track (and usually it's the case for the first one), you can just create this folder and leave it empty (or you could copy a data folder from an existing track, and only modify the files you might wish to look into).
2- If you plan on customizing your track further, here is an explanation of (some of) the files contained in DATA folder:
audio_sources.ini - used to link audio events to audio dummy emitters placed in your scene
cameras.ini - used to define camera sets (TV type); you can define it manually or in SDK Editor. It needs the AI line to automatically switch from one camera to another; otherwise it will remain blocked on the first camera in the set. You can define as many sets as you like, just name them cameras.ini, cameras_1.ini, cameras_2.ini, etc.
crew.ini - used to define the position of the PIT guy to the left (1) or right(-1) side of your car.
groove.ini - used to define the behavior of the groove overlay. How fast it gets darker and by how much.
lightning.ini - used to define the pitch and angle of the sun
surfaces.ini - probably the most important, because you can use it to define new types of surfaces.
\ui\
defines the basic data to be displayed in the track selection menu, in game.
preview.png - image that will be shown on the track selection menu
outline.png - track layout that will be overlayed the preview image
ui_track.json - basic info about the track (it will be self explanatory once you work on an existing one).
\map.png
the image used for the track map, in-game.
\yourtrackname.kn5
the main track file, containing track's geometry, materials and textures
\texture
IMPORTANT, as this will be used by the exporter when setting up materials/shaders.
Use it to store all the textures you plan using for your track.
This does not exist in a typical track folder (it is not needed when playing the game), because it will be included into the kn5 file, after the final export.
BUILD TRACK in 3D SOFTWARE:
Build your basic track geometry as you see fit, in your preferred 3d software package. Assign your materials. I’ll assume you have the basic skills to do that. If not, you can find lots and lots of tutorials on YT.
PREPARE TRACK FOR EXPORTING:
Once you are happy with your project, you have to to make it usable by the AC physics and graphics engine. In order to do that, you’ll need :
1. In your 3D SOFTWARE
a. to respect the object naming convention (for the objects with physical properties)
b. to create the spawn & timing objects
c. to export to FBX2012 format
2. In AC EDITOR
a. Import the fbx file you just created
b. Define the shaders/materials
c. Export to KN5
NOTE: if SDK Editor looks low-res/B&W, see this post.
3. Fire up AC and enjoy your first track.
1A: Naming convention:
The AC physics engine takes into account the naming of your tracks objects/meshes in order to give them physical properties. Syntax is as follows:
<ID><name><optional_suffix>, where :
ID – is a number greater than 0, if you'd like it to have some physical properties
name – is the name of your object/mesh
optional_suffix – as the name says, you can use it if it helps, but has no impact on the properties
The <ID> parameter has to be greater than 0, if you'd like your object/mesh to have physical properties. Otherwise it can be 0, or missing, and your mesh will be only a graphical asset.
The <name> parameter is very important and deserves some more explanation, as it will be used to define both the collision mesh and the rolling surfaces. In that purpose, there are a few pre-defined keywords that you can use. These are:
WALL anywhere in meshname makes it a physical wall! No number required...
Define collisions mesh:
- While it is possible to quickly define an object as an obstacle (fence, building, pole, barrier, …) just by naming that object using WALL, its recommended to keep same naming convention as for the other surfaces call them 1WALL, or 2WALL, or any number greater than 0.
ROAD, GRASS, KERB, SAND basic surface types, already defined in assettocorsa\system\data\surfaces.ini
The file "surfaces.ini" is a file normally contained by every track folder. You can use it to define the properties of custom surfaces. Each section of the file represent a surface identified by a name, and parameters like friction, FFB behavior, etc
Define surfaces:
- in order to set a specific mesh to act as a physical surface (anything you can drive on) you have to use one surface type keyword in it's name. You can chose from the basic ones, or you can define your own.
Examples, with basic surfaces:
1ROAD_3 – will make my chosen mesh drivable (in surfaces..ini: KEY=ROAD)
1SAND_003 – will make my chosen mesh act like the sanded areas (in surfaces..ini: KEY=SAND)
Examples with custom surfaces, IF defined in \mytrackfolder\data\surfaces.ini
1CONCRETE_new_001 (in surfaces..ini: KEY=CONCRETE)
5GRAVEL_old_0 (in surfaces.ini: KEY=GRAVEL)
1PIT, 2PIT, etc - name of the pit area mesh (instead of 1ROAD, ...) to make it act like pitlane with limited speed.
Don't forget to define the PIT surface, in surfaces.ini (see this post)
*****end of section 1A
1B: Spawn & timing objects:
Depending on the type of location you are planning to make, the minimal* objects needed in order to make your track work in all modes (race, hotlap, practice) are:
For circuit-type tracks:
AC_START_0
AC_START_1
AC_PIT_0
AC_PIT_1
AC_HOTLAP_START_0
AC_TIME_0_L
AC_TIME_0_R
AC_TIME_1_L
AC_TIME_1_R
For A-to-B type stages:
AC_AB_START_L, AC_AB_START_R
AC_AB_FINISH_L, AC_AB_FINISH_R
Keep the same naming for pit spawn points
Keep the same naming for hotlap start spawn point
No starting grid.
(*) might work with single start and pit objects, but haven't tested it.
These objects can be simple CUBES, with a random (preferably from the scene) material assigned to them. You can also use dummies (3dsmax) or empties (blender) and in that case you no longer need to worry about material.
Place them 1 or 2 meters above track surface. Three conditions to make sure everything will work as expected:
1. respect the naming scheme
2. make then invisible
3. make sure to respect the axis orientation (pivot point Y up, Z forward)
Pits position must be named:
AC_PIT_n (n must be 0, 1, 2, 3, 4 etc) DON'T name it AC_PIT_01 (01 is different from 1)
Start positions must be named:
AC_START_n
Hotlap start position must be named:
AC_HOTLAP_START_0
In general anything related to a position must follow this rule: the Y axis of the pivot point must point UP and the Z axis must point forward and will determinate the orientation of the car. This is VERY important for 3dStudioMax users, where usually Z axis is UP and Y axis is Forward, beware.
Timing:
These objects don't need the axis orientation like the spawn objects
AC_TIME_0_L
This must be placed on the LEFT side of the start/finish
AC_TIME_0_R
This must be placed on the RIGHT side of the start/finish
AC_TIME_1_L
AC_TIME_1_R
Same rule about left and right but it will became the first intermediate.
AC_TIME_2_L
AC_TIME_2_R
The second intermediate.
You can place only 2 intermediates.
The trigger will be an imaginary line from the center of the object to the other side (not visible obviously)
More goodies (other dummy objects):
AC_POBJECT_suffix - use this format as name if you'd like to have colidable/movable objects in your scene (cones, for example). In order to avoid unexpected issues, they work best when used on objects with simple geometry, and devs recommend not having too many (not more than 15 iirc). Even though you could get away with more.
AC_AUDIO_suffix - use it to place external audio sources at various positions on track. Example: sound of water near a river, sound of crowds near grand stands, sound of birds near a forest, .. Do note, this is only the "trigger" position, you will need to link it to a sound and some characteristics - and for this, you must use the file audio_sources.ini, located in DATA folder (see above).
*****end of section 1B
1C: export to FBX2012
Recommended settings when exporting
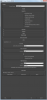
3DSMAX :
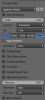
BLENDER (2.8+)
(maybe use Forward: +z)
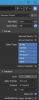
Legacy Blender (2.78+) (courtesy of @LilSKi )
Notes:
1/ the circled scale button; set to 1 and uncheck the little button.
2/ the "selected objects" check (your choice if you export entire scene or selection)
3/ you might need to also select "Empty" in case you have used them for spawn points
*****end of section 1C
2A: import in AC EDITOR
You can find a basic tutorial by Simone here:
*****end of section 2A
2B: Define shaders/materials
Also described in the same tutorial as above.
Also, a very useful resource is the Track Materials / Shaders thread.
While at the beginning we were only discussing the json file setting to be used with Hagn exporter plugin, the discussion switched towards the AC EDITOR settings, after its release. About from THIS POST
However, DON'T miss the first post where @Sneer is doing a great job collecting useful settings. Thank you sir Sneer
*****end of section 2B
2C: Export to kn5.
Attention:
- the name of the exported file must be identical to the name of track folder.
- use only lowercase, otherwise track might create problems when used in multiplayer
*****end of section 2C
3 HALLELUIAH ! This is the moment you've been waiting ! If everything went well above, you should be able to drive on your very first track.
*****END OF GUIDE *****
And, that you've understood the whys.. "la cerise sur le gateau": AC member Keyrocker created a video explaining the hows:
I'd like to take a moment and thank Kunos, Simone and the community for this "collective learning stage", this guide would not exist otherwise.
I hope this will be enough to help you get started, and hope to see new track artists rise soon enough . If you get stuck, or have something to add, or have some questions, or see something not accurate, please don't hesitate to post a reply.
. If you get stuck, or have something to add, or have some questions, or see something not accurate, please don't hesitate to post a reply.Attachments
-
 41.8 KB Views: 3,167
 -
 21.8 KB Views: 29,139
 -
 55.4 KB Views: 1,324
 -
 26.8 KB Views: 56,009
Last edited by a moderator:
