Before anything, all credits for this guide go to
@LilSKi , who took the time to share (<<thank you). If you are not familiar with him, his tracks (e.g. Bridgehampton Race Circuit) are one of the best modded tracks out there.
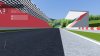
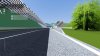
Back to our guide, this is what we aim to.. ahm no, what we WILL obtain by following the indications below.
View attachment 1306
View attachment 1307
The shader to use (the that Kunos also uses in official tracks) is
ksMultilayer_fresnel_nm
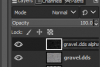
Here are the settings from the SDK Editor.
View attachment 1308
View attachment 1309
Let's go through all those textures and how to set them up to produce what you see above.
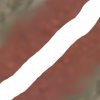
1/ the road diffuse.
This texture should be
1024x4096. You want
as long a texture as possible to limit the amount of times it repeats. Shown below is the diffuse with the alpha channel next to it. Basically, the alpha channel here is your specular level. White is 100% and black is 0%. What I simply do is make the alpha channel a copy of the diffuse and adjust the levels how I want them to be. The format of the diffuse should be
DXT5 and with about 4 mipmaps.
View attachment 1310
In general you only want to use one single diffuse for your entire road. You may ask "how do I get color variations and such?" The answer is in the detail textures which I will get to that in a later post.
2/ the mask.
My mask is fairly small at
128x512. It does not need to be as large as the diffuse. Mine looks like this and is in
DXT3 format with 4 mipmaps.
View attachment 1311
The red is where the main road detail image is shown and the purple is where the main red channel detail is mixed with the blue channel crack texture. You can play with this bad boy all day long and even mix in the green channel if you want with another detail texture. I only used the two channels. You shouldn't need to use the alpha channel with this so it should be 100% black if it is not used with a detail texture.
3/ txDetailR - the main detail image (in this example).
It should be
1024x1024 in DXT5 format with 4 mipmaps and it looks like this. The main texture is on the left and the alpha channel is on the right. This alpha channel is also specular so here you want it fairly dark with only some pebbles light to light up by the sun.
View attachment 1312
3.1/ txDetailG
If you are not using any of the color channels in the mask you can simply repeat the main detail image just to complete the form in the editor. In my case I don't use green so it gets the main detail again.
3.2/ txdetailA is also not used in this case, so it can be set to the main detail like the green channel.
4/ txDetailB - The blue channel
Used in this example for the cracks texture. It should be
512x512 and DXT3 with 4 mipmaps. Again the alpha channel is specular. You will have to fine tune it so it matches the detail texture it blends with.
View attachment 1313
5/ normal map.
It should be 1024x1024. No alpha is used on this and it can be DXT1 with 4 mip maps. You adjust the normal map resolution with the two numbers in "detailNMMult"
View attachment 1314
Final note from the author: I hope this helps clear up how to set the textures to make this shader work properly. I would suggest you use my settings to start and then you can play with the numbers to make them work for you.
..and a possibly useful note from
NightEye: I found that Photoshop exports a full black alpha as full white somehow. Making the alpha #010101 fixes this. It doesn't matter if you use a black detail texture, though. But it's worth mentioning for people who experience weird results inside the Editor.
***
So there it is, asphalt in all its glory. If you get this to look right, it's a huge step in bringing your track to "AC standards".
***
PS: an alternative explanation, you can also find in
this post from
@Pixelchaser , should that "speak" better to you. Whichever you choose, good luck and let us know your results !