@maruto, I made some subtle changes to the AI. See the zip file.
Nothing drastic, but with
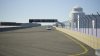
@Johnr777's tips, they do not crash as often now into Porte Duplessis and at the end of Boulevard du Carmel. Btw, good work
@Brandydo !
I have a little, OK big, request !
Do you think you can fix the pitlane ?
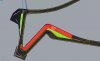
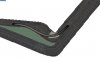
I don't know if I'm alone, but I see a few issues:
- there's no speed limit;
- cars aren't ghosted;
- with the latest AI changes I made, I get a yellow flag anytime a car move inside this area.
I think it all pertains to naming assignment in kseditor and/or blender (if that is what you're using). Somehow, the game thinks the pitlane is part of the track.
This thread also has some info.
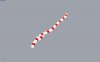
If you want to have more spawn points, check
@LilSKi's
video about spawn points, I think it might help.
I wish I could do more to help.
P.S. I'm having a blast with the track... I did a 20 laps race today with GT3 and GT4 cars, AI 85-100% (aggression @ 100%) and got no road-blocking pile-ups !
")