LAST EDIT:
04-09-2017: feedback from Pankykapus (3D artist at Kunos)
27-08-2017: added info from @garyjpaterson (ty)
11-01-2019: added folder name length restrictions (thanks @fughettaboutit )
***
Happy modding") .
.
PS:
I have attached the complete folder for the above project. It only misses the bank file, due to its size. If you want to run it in-game, you just need to copy the bank file from the cobra and rename it to acm_tutorial_basic.bank (the GUIDs is already prepared for this car). Why this car ? It had the smallest bank file.
PPS: the sample car will run in-game. But not in Showroom (which requires additional dummies).
04-09-2017: feedback from Pankykapus (3D artist at Kunos)
27-08-2017: added info from @garyjpaterson (ty)
11-01-2019: added folder name length restrictions (thanks @fughettaboutit )
***
INTRODUCTION
There are already tutorials on car modding for Assetto Corsa out there. However, I feel they don't treat the subject as a whole. Example - the car_pipeline*.pdf directly coming with Assetto Corsa (typically under \STEAM\steamapps\common\assettocorsa\sdk\dev). It's long and complex, and has a lot of useful information. But it concentrates too much on the graphical side and not enough on the rest. And that makes it not so straight forward to succeed with your first car. I personally like to start simple and once that is clear, continue to build on it. If you're anything like me, then please keep reading.
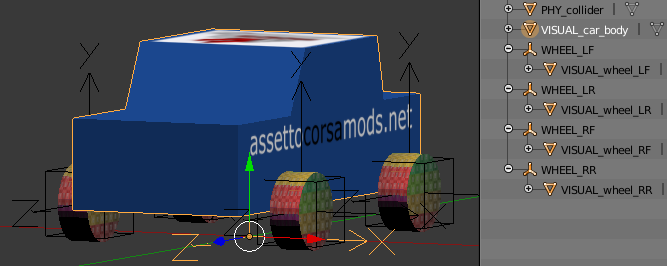
What you see, does NOT matter.
Well, it matters if you want to make a top mod, and boost immersion, of course. And that should be our ultimate goal. But from AC engine's point of view, you could drive a cube. Or you could simply drive on thin air. Under the hood, a complete working car looks like this (selected cube being the front left wheel):
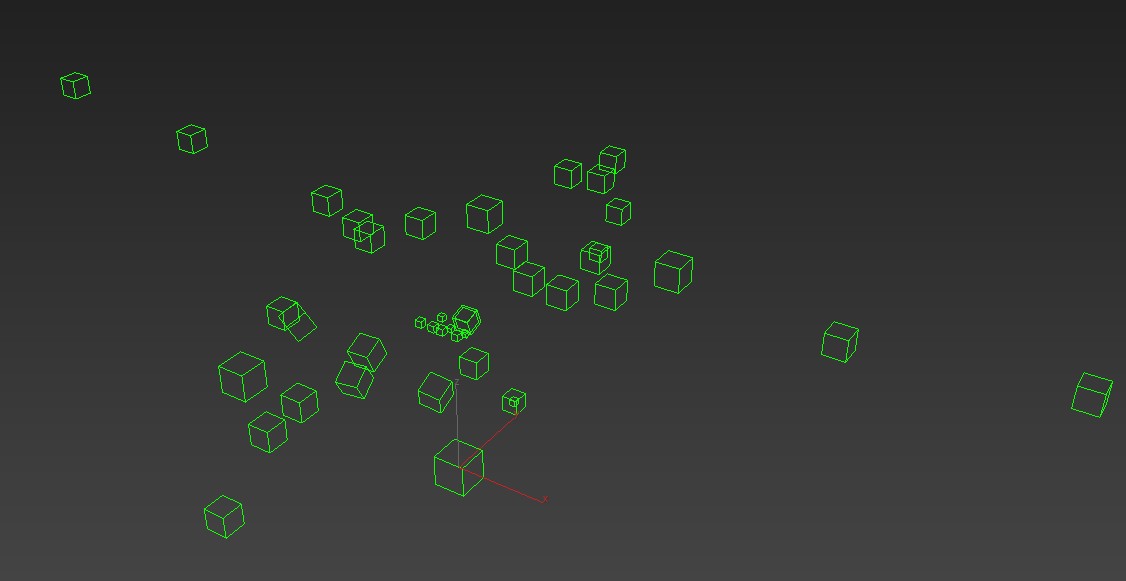
*a bunch of dummies with specific orientation and names.
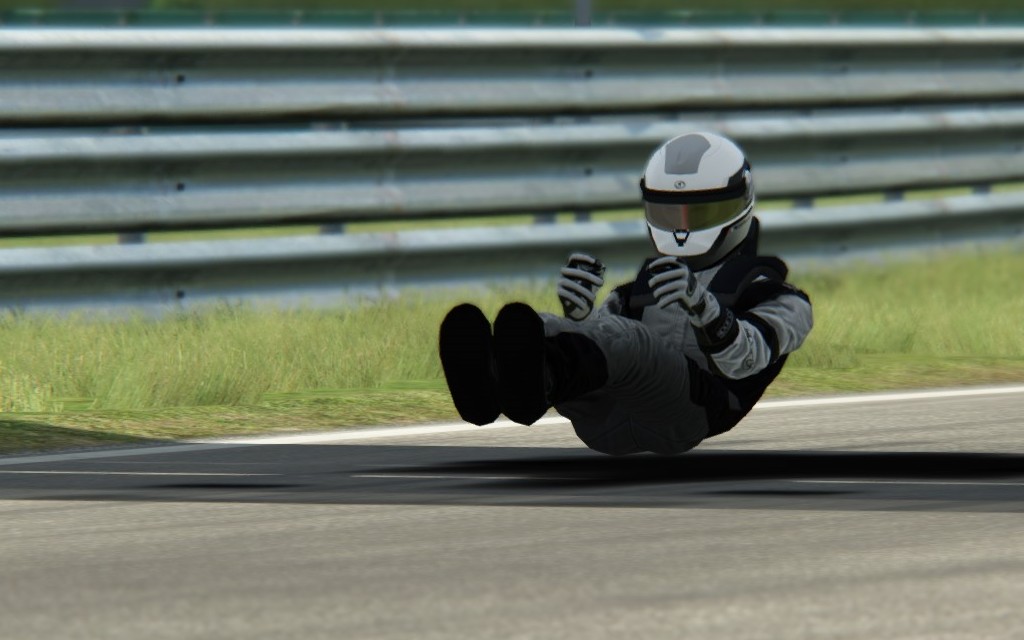
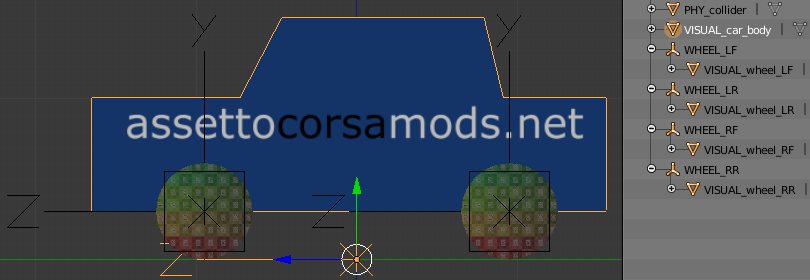
..while what you actually see, could be this. Just the pilot hovering. But still, a working "car".
The point is, do not be distracted by the visual mesh. All the work is done by the dummies (also known as null, helper, empty, etc) and their naming. For those familiar with 3d animation, AC is working in the same way: dummies act like an interface between what user wants to see and what the engine understands. Create them, name them correctly, place them at key joint points and have fun with the result by attaching the visual mesh(es).
TL;DR : We like it simple (and hopefully you too); we use dummies (and you will too).
LET'S DO THIS
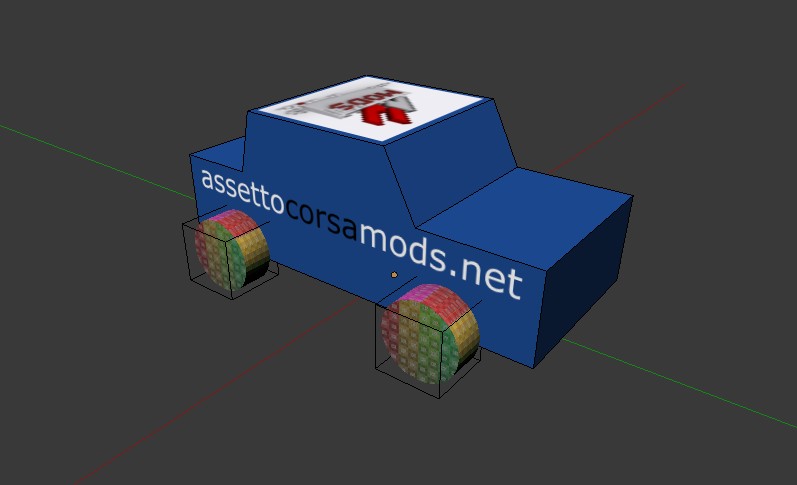
Our goal is to create the simplest working car. However, just the pilot flying would be a little boring. So, we are going to take just one tiny step further. We are going to use this exotic car model. I have put a lot of effort into making it, obviously.
These are the main steps:
1/ Prepare and populate the folder structure
2/ In your 3D software (Blender, 3DS Max, Maya, etc):
-a/ respect the dummy naming
-b/ respect hierarchy between dummies and mesh
-c/ export to FBX up to 2014/2015 format (2016 is unsupported)
3/ In KS EDITOR (aka SDK Editor, AC SDK, AC Editor)
-a/ import the car .fbx file you have just created
-b/ define the shaders/materials
-c/ export to .KN5
-d/ repeat for collider
4/ Edit \DATA\*.ini files
5/ DRIVE !
1/ Folder structure
This is the first step. A good, clean folder structure will always make things easier. But this is also required, so that AC understands it. This is a small project, so I have used the same folder for all the files, from 3D to kn5. When you'll be working on that awesome car of yours, you might want to have 2 separate folders, one DEV folder with all reference data and 3d models, and one "driving" folder in \content\cars.
NOTE: We are going to base the tutorial on the Formula K provided in \assettocorsa\sdk\dev\content\cars\formula_k. And simplify it. So we'll copy only some of its contents. I will specify it when the case.
So, our example car is called acm_tutorial_basic. Therefore, that's also the name of the folder. Like we mentioned, everything is already in place for the final export.
 naming restrictions for track- and car-folders, from shared memory definitions:
max length for track folder name: 32
max length for additional layout folder name: 15
max length for car folder name: 32
(keep all lowercase and latin characters to work for ContentManager's distance driven feature to work properly)
Full path:
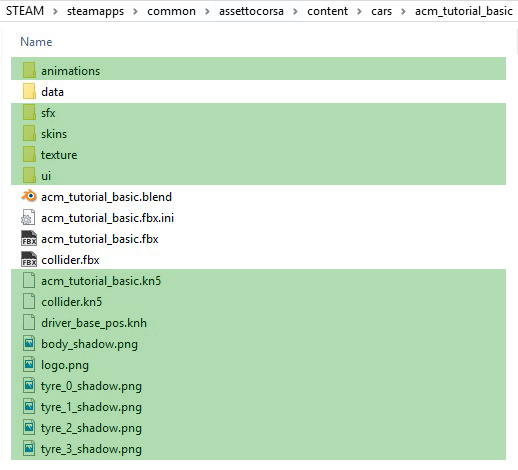
The green rectangles indicate the mandatory files and folders for the exported car. "White" files are only there during development, and you'd want to take them out before releasing your car publicly. Let's discuss the contents. A * mark, means we'll get back to it with more detail.
\animations
2/ Preparing your 3D model
Screens here are made in Blender, as that's the tool at hand. Similar concept will apply for 3dsmax, Maya or other modelling package.
*above scene will also be attached to present post
2A: dummy names
Set scale to Meters.
Model the basic car. A car body and 4 wheels. All objects MUST have a material/texture.
Naming (for visual mesh) can be anything. I prefer to use a prefix like VISUAL so it's clear what part is what.
Create dummies that control the wheels. Remember, when we use dummies, the names are key factor, so always respect them. (use CAPS). In present case (LF stands for Left Front, LR for Left Right, etc):
WHEEL_LF
WHEEL_LR
WHEEL_RF
WHEEL_RR
NOTE: never scale them once created (especially if working in 3dsmax). For game logic, it doesn't matter what size they are, but scaling them afterwards can cause all sorts of issues.
2B: respect scene hierarchy
Make every mesh a child to its respective dummy !
In this case, we want the wheels to rotate, so we need to make the visual wheel a child to the dummy. E.g.: Visual_wheel_LF mesh is a child of WHEEL_LF dummy.
The hierarchy is very important. If we don't respect it, the car might load ok, but nothing will move. The wheels would be stationary as if part of the body design.
IMPORTANT NOTES:
- all dummies must have Z-axis pointing forward and Y-up.
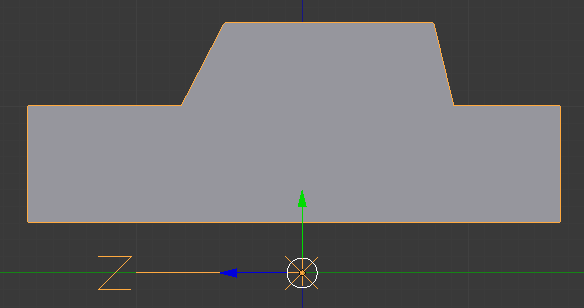
- car's body origin/pivot point : the model must be placed with the wheels touching the ground on the 0 coordinate (see below).
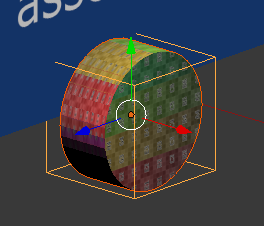
- pivot point of dummy must be identical to pivot of child mesh (or vice-versa). E.g. below: wheel mesh (colored texture) and the dummy (cube) have identical origin/pivot point.
2C: export to FBX format
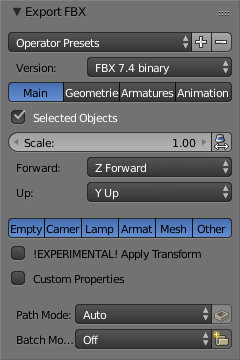
Great, you have everything setup. You are ready to export to FBX (up to 2014/2015 format; 2016 is unsupported). If you are working in Blender, it is a good practice to check the box Selected Objects. This will allow you to only export what you have selected (e.g. car + wheels, but NOT collider; supposing you have them all in the same scene).
Also, pay attention to the little button next to scale (must be deselected).
Export in the same folder (see folder photo above).
Awesome. Now, KS EDITOR time !
3A: import the car .fbx
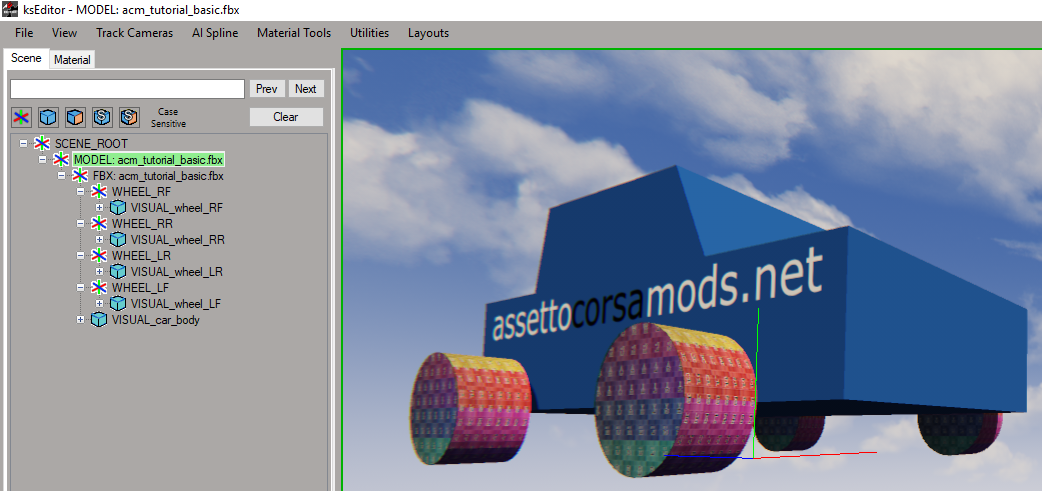
You should see something like this (if the car is black, you are probably missing textures. You can reassign them here in the editor - just go to material tab, select object, reassign texture).
3B: define the shaders/materials
For this tutorial, it doesn't really matter what material/shader settings you are using. Just play with values till you like what you see. We'll cover car shaders in separate topics.
3C: export to .kn5
- the name of the exported file must be identical to the name of car folder (see folder photo above).
- use only lowercase, otherwise you might run into issues
3D: collider
- physics/collisions calculation is very CPU intensive (especially when everything needs to happen in milliseconds). Therefore using a high poly mesh for collisions would be impossible. It is therefore required to use a VERY (40-60 triangles) low poly basic shape as collision box.
- repeat above steps 2C to 3C for collider. Name it collider.kn5 and export to your car folder (see folder photo above). Note you need to set it with a material called GL, then assign the GL shader in KsEditor before exporting.
- for this tutorial, the car geometry is very simple, so we are going to use a copy of the body (only body, no wheels, no dummies). But, for your future projects, you will need to define a basic box about the same size as the car.
- notice the pivot point also at 0 (Y) as the car.
- NO vertex under the car bottom (so DON'T go as low as the ground)
Good, now you are done with the graphical part.
***
PHYSICS
Now that AC engine knows how to communicate with our visual car, we need to define all that nice technical data about our vehicle. That will determine its behavior inside the sim.
4: Edit \DATA\*.ini files
Again, we will start with base files from formula_K.
BUT, for the very first car, we don't need them all. I have reduced the number of files (and modifications) to a minimum in order to get your car moving. After that, it's just a matter of studying and crunching numbers in order to bring the behavior close to what's expected. Most of them, are self-explanatory once you take a look inside.
So, I divided the ini files in multiple categories, as you will see below.
Where editing is required, that is also indicated.
MANDATORY (without them, the car will not load and game will crash)
aero.ini :used to define all wing-type objects
- delete all the wings except 'body', then delete all the wings *.aoa files except body.
- uses (therefore also needed):
- wing_body_AOA_CD.lut - defines the lookup table for Coefficient of Lift
- wing_body_AOA_CL.lut - defines the lookup table for Coefficient of Drag
* you can add as many wings you wish, but don't forget to add the corresponding _CD and _CL .lut files for them
cameras.ini - default is ok to start with
car.ini : car parameters.
- we should at least change the SCREEN_NAME (can be anything), as it will appear while in-game
- IMPORTANT: we don't deal with suspension animation at this point so be sure to set USE_ANIMATED_SUSPENSIONS=0
driver3d.ini : default is ok to start with
engine.ini : defines engine parameters.
- uses the lookup table:
- power.lut (mandatory)
- note: no coast.lut file is required anymore. Must keep the section in engine.ini to keep AC from crashing, but do not use for data.
lods.ini : used to improve performance (but we'll speak about it another time)
- edit block LOD_0, and put your .kn5 file name
- since we don't have any other LODs at this moment, we delete all other blocks LOD_1, 2, etc
suspensions.ini : suspension type and data
- modified wheelbase to 1.9m and CG to 0.3 to match more or less our little 3d model (visual reasons).
- NOTE: this indicates the car's CG so a better suited value to start with is 0.5 (50%front)
tyres.ini : define tyres parameters.
- uses lookup tables for both wear and temperature. Depending on the type of tyre you wish to use, corresponding *.lut file must be added. In this case:
F3hard_front.lut
F3hard_rear.lut
tcurve_F3hard.lut
etc.
final.rto, ratios.rto
These can be deleted, they are used for cars with multiple gear ratio options (as it's the case for formula_k). The setup.ini will refer to this, so if you do remove them, then make sure to amend that too (just delete the relevant section).
OPTIONAL, BUT MANDATORY (car should load, but behave weird)
brakes.ini : brake parameters
- car will load in-game, but.. you'll have no brakes (this is the way James Bond's car would be sabotaged in Assetto Corsa, for example)
colliders.ini : defines collision behavior for bottom of the car (car bottom touching the ground). This should come as an addition to the collider we already have (that handles all other body collisions).
drivetrain.ini : drivetrain parameters
- car will/should load, but you can't engage any gear.
setup.ini : used to define all the available option user has in garage
- car will/should load, but when you hit drive, game could crash.
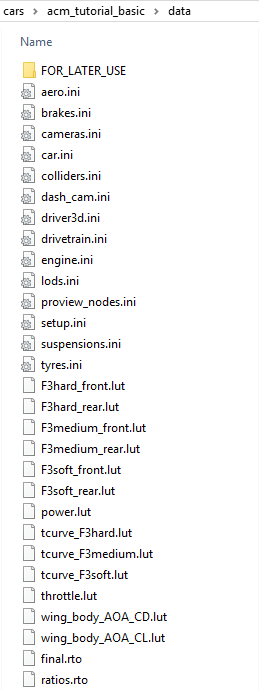
At this point, your data folder should look like this:
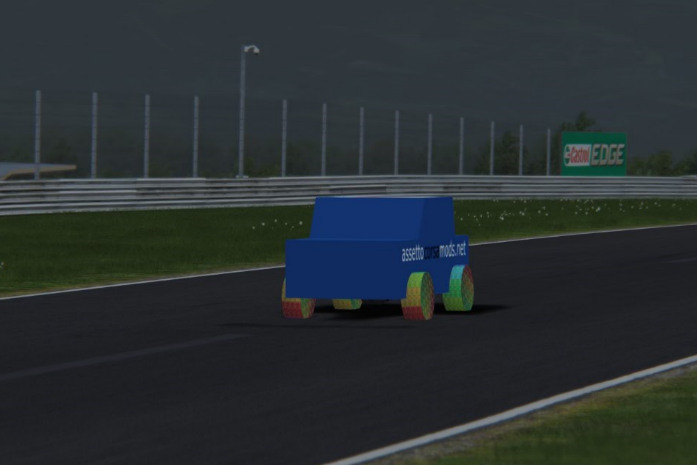
..aaaand you should have a complete working car ! GO DRIVE THIS BEAST !
***
When you want more, you'll notice the presence of a sub-folder named FOR_LATER_USE. That one contains all the files that are optional at this phase (meaning your first drive), but should be defined and moved to data folder for the final car. A few words on them:
throttle.lut : This controls your throttle map (though very simple, just a 0-100% input versus output). This will have a perfect linear throttle, you can tweak it later:
/gary
ai.ini : AI parameters
ambient_shadows.ini : defines size of car shadows
analog_instruments.ini : controls analog dash instruments
blurred_objects.ini : when you will wish to include blurred rims on your car, you will need this file.
- do NOT forget it later
digital_instruments.ini : controls digital instrumentation incar
Just a reminder to always delete the contents of this at a start of a new project, always causes crashes as its looking for a dummy that is likely not there on your model. /gary
damage.ini : controls visual damage level
dash_cam.ini :
electronics.ini : controls electronic driving aids car might have
escmode.ini : controls the orbiting camera you sometimes see in the pits, the height/distance it is away from the car. /gary
flame_presets.ini : very detailed info about exhaust flame phases, never messed with this before. /gary
flames.ini : this is the simple controls for exhaust flames, used to control the position and direction. Tip - open the console (press Home), enter "set observeFlames 1" (case sensitive) and you can see the flames and can edit them realtime. /gary
lights.ini : different light parameters
mirrors.ini : mirror parameters
- important when you'll include mirrors
sounds.ini : sound parameters (e.g. engine position). Without it, probably defaults to some standard sound configuration (?)
suspension_graphics.ini : Genuinely have no idea what this is for, never used it/seen it used for any car even those with animated suspension. Just leave it blank. /gary
wing_animations.ini : animated wings
NOT REQUIRED (delete/ignore)
proview_nodes.ini - delete. Will be automatically created.
coast.lut (obsolete)
FINAL NOTES
If you change the name of a folder/car, you need to check 3 things:
- name of folder and name of kn5 file are identical
- edit lods.ini and change the name of the kn5 to be used
- change bank file (and GUIDs if the case)
This is really a BASIC guide. It's meant to get your first creation moving. Once you understand how it works, the rest is just a matter of adding additional dummies to different car parts. Although, some additional guides should surface this forum, don't hesitate to consult the pipeline doc. NOW, it will be more relevant since you know the link between different components of a complete mod car.
There are already tutorials on car modding for Assetto Corsa out there. However, I feel they don't treat the subject as a whole. Example - the car_pipeline*.pdf directly coming with Assetto Corsa (typically under \STEAM\steamapps\common\assettocorsa\sdk\dev). It's long and complex, and has a lot of useful information. But it concentrates too much on the graphical side and not enough on the rest. And that makes it not so straight forward to succeed with your first car. I personally like to start simple and once that is clear, continue to build on it. If you're anything like me, then please keep reading
.What you see, does NOT matter.
Well, it matters if you want to make a top mod, and boost immersion, of course. And that should be our ultimate goal. But from AC engine's point of view, you could drive a cube. Or you could simply drive on thin air. Under the hood, a complete working car looks like this (selected cube being the front left wheel):
*a bunch of dummies with specific orientation and names.
..while what you actually see, could be this. Just the pilot hovering. But still, a working "car".
The point is, do not be distracted by the visual mesh. All the work is done by the dummies (also known as null, helper, empty, etc) and their naming. For those familiar with 3d animation, AC is working in the same way: dummies act like an interface between what user wants to see and what the engine understands. Create them, name them correctly, place them at key joint points and have fun with the result by attaching the visual mesh(es).
TL;DR : We like it simple (and hopefully you too); we use dummies (and you will too).
LET'S DO THIS
Our goal is to create the simplest working car. However, just the pilot flying would be a little boring. So, we are going to take just one tiny step further. We are going to use this exotic car model. I have put a lot of effort into making it, obviously
.These are the main steps:
1/ Prepare and populate the folder structure
2/ In your 3D software (Blender, 3DS Max, Maya, etc):
-a/ respect the dummy naming
-b/ respect hierarchy between dummies and mesh
-c/ export to FBX up to 2014/2015 format (2016 is unsupported)
3/ In KS EDITOR (aka SDK Editor, AC SDK, AC Editor)
-a/ import the car .fbx file you have just created
-b/ define the shaders/materials
-c/ export to .KN5
-d/ repeat for collider
4/ Edit \DATA\*.ini files
5/ DRIVE !
1/ Folder structure
This is the first step. A good, clean folder structure will always make things easier. But this is also required, so that AC understands it. This is a small project, so I have used the same folder for all the files, from 3D to kn5. When you'll be working on that awesome car of yours, you might want to have 2 separate folders, one DEV folder with all reference data and 3d models, and one "driving" folder in \content\cars.
NOTE: We are going to base the tutorial on the Formula K provided in \assettocorsa\sdk\dev\content\cars\formula_k. And simplify it. So we'll copy only some of its contents. I will specify it when the case.
So, our example car is called acm_tutorial_basic. Therefore, that's also the name of the folder. Like we mentioned, everything is already in place for the final export.
naming restrictions for track- and car-folders, from shared memory definitions:max length for track folder name: 32
max length for additional layout folder name: 15
max length for car folder name: 32
(keep all lowercase and latin characters to work for ContentManager's distance driven feature to work properly)
Full path:
The green rectangles indicate the mandatory files and folders for the exported car. "White" files are only there during development, and you'd want to take them out before releasing your car publicly. Let's discuss the contents. A * mark, means we'll get back to it with more detail.
\animations
- this is where the animation files are stored for a car. Things like gear shift, steering, etc. You can just copy this from formula_K or other car.
\data*- this is the key folder in your future car. Inside are all the ini files we need to work on for the physics. Once the car is ready to go public, there is a possibility to release it exactly as is, but nowdays the entire folder is packed in one single file called data.acd
\sfx - the sound folder. Assetto Corsa uses the FMOD audio engine and all the sounds of a car are packed in a .bank file. We are not going to go into the "how-to" for sound at this point (this will be another nut to crack). However, in order to have a working car mod, we DO need a sound. Therefore, we'll speak about the simple solution, using an existing car's .bank audio file. See THIS for info (you can skip step 2, if in a hurry).
\skins - skins folder. Every skin, has it's own sub-folder. You might want to edit the preview.
\texture - very important folder. All the car's textures must be here. To start, you can copy it from formula_k, because it also contains some common shared textures, in the sub-folder flames. Otherwise, whatever new texture you create and use on your car, just drop it directly in the \texture folder.
Once the model is finished and exported to kn5 file, all your textures will be included in the kn5. So you can then delete all, and just leave the "default" texture folder you copied from the formula_k.
BONUS: if you use this folder from the beginning, during your modelling phase, the materials will be already assigned to the car when you open it in KS Editor.
\uiOnce the model is finished and exported to kn5 file, all your textures will be included in the kn5. So you can then delete all, and just leave the "default" texture folder you copied from the formula_k.
BONUS: if you use this folder from the beginning, during your modelling phase, the materials will be already assigned to the car when you open it in KS Editor.
- this is used in the menu and contains 2 files: the badge (PNG, 128x128 px) and basic data for the car in the ui_car.json. You should at least edit the name, so it will be easy to find your creation in the menu . You can edit it with notepad, but for convenience and all the other text files you need to modify, I recommend something like Notepad++.
\acm_tutorial_basic.kn5*. You can edit it with notepad, but for convenience and all the other text files you need to modify, I recommend something like Notepad++.
- your car, exported from KS Editor (with textures). Notice the identical name as the folder.
\collider.kn5*- this is a very boxy version of you car, used for physics calculations.
Rest of the files (driver_base_pos.knh to tyre_3_shadow.png you can just copy them from formula_K at this point.
2/ Preparing your 3D model
Screens here are made in Blender, as that's the tool at hand. Similar concept will apply for 3dsmax, Maya or other modelling package.
*above scene will also be attached to present post
2A: dummy names
Set scale to Meters.
Model the basic car. A car body and 4 wheels. All objects MUST have a material/texture.
Naming (for visual mesh) can be anything. I prefer to use a prefix like VISUAL so it's clear what part is what.
Create dummies that control the wheels. Remember, when we use dummies, the names are key factor, so always respect them. (use CAPS). In present case (LF stands for Left Front, LR for Left Right, etc):
WHEEL_LF
WHEEL_LR
WHEEL_RF
WHEEL_RR
NOTE: never scale them once created (especially if working in 3dsmax). For game logic, it doesn't matter what size they are, but scaling them afterwards can cause all sorts of issues.
*Blender has a great little thing - when you create an empty, you can choose whether it's just axis, or a cube, or sphere, etc. Since for the wheels we'll have overlapping empties, it might be a good idea to make them different shapes.
2B: respect scene hierarchy
Make every mesh a child to its respective dummy !
In this case, we want the wheels to rotate, so we need to make the visual wheel a child to the dummy. E.g.: Visual_wheel_LF mesh is a child of WHEEL_LF dummy.
The hierarchy is very important. If we don't respect it, the car might load ok, but nothing will move. The wheels would be stationary as if part of the body design
.IMPORTANT NOTES:
- all dummies must have Z-axis pointing forward and Y-up.
- car's body origin/pivot point : the model must be placed with the wheels touching the ground on the 0 coordinate (see below).
- pivot point of dummy must be identical to pivot of child mesh (or vice-versa). E.g. below: wheel mesh (colored texture) and the dummy (cube) have identical origin/pivot point.
2C: export to FBX format
Great, you have everything setup. You are ready to export to FBX (up to 2014/2015 format; 2016 is unsupported). If you are working in Blender, it is a good practice to check the box Selected Objects. This will allow you to only export what you have selected (e.g. car + wheels, but NOT collider; supposing you have them all in the same scene).
Also, pay attention to the little button next to scale (must be deselected).
Export in the same folder (see folder photo above).
Awesome. Now, KS EDITOR time !
3A: import the car .fbx
You should see something like this (if the car is black, you are probably missing textures. You can reassign them here in the editor - just go to material tab, select object, reassign texture).
3B: define the shaders/materials
For this tutorial, it doesn't really matter what material/shader settings you are using. Just play with values till you like what you see. We'll cover car shaders in separate topics.
3C: export to .kn5
- the name of the exported file must be identical to the name of car folder (see folder photo above).
- use only lowercase, otherwise you might run into issues
3D: collider
- physics/collisions calculation is very CPU intensive (especially when everything needs to happen in milliseconds). Therefore using a high poly mesh for collisions would be impossible. It is therefore required to use a VERY (40-60 triangles) low poly basic shape as collision box.
- repeat above steps 2C to 3C for collider. Name it collider.kn5 and export to your car folder (see folder photo above). Note you need to set it with a material called GL, then assign the GL shader in KsEditor before exporting.
- for this tutorial, the car geometry is very simple, so we are going to use a copy of the body (only body, no wheels, no dummies). But, for your future projects, you will need to define a basic box about the same size as the car.
- notice the pivot point also at 0 (Y) as the car.
- NO vertex under the car bottom (so DON'T go as low as the ground)
Good, now you are done with the graphical part.
***
PHYSICS
Now that AC engine knows how to communicate with our visual car, we need to define all that nice technical data about our vehicle. That will determine its behavior inside the sim.
4: Edit \DATA\*.ini files
Again, we will start with base files from formula_K.
BUT, for the very first car, we don't need them all. I have reduced the number of files (and modifications) to a minimum in order to get your car moving. After that, it's just a matter of studying and crunching numbers in order to bring the behavior close to what's expected. Most of them, are self-explanatory once you take a look inside.
So, I divided the ini files in multiple categories, as you will see below.
Where editing is required, that is also indicated.
MANDATORY (without them, the car will not load and game will crash)
aero.ini :used to define all wing-type objects
- delete all the wings except 'body', then delete all the wings *.aoa files except body.
- uses (therefore also needed):
- wing_body_AOA_CD.lut - defines the lookup table for Coefficient of Lift
- wing_body_AOA_CL.lut - defines the lookup table for Coefficient of Drag
* you can add as many wings you wish, but don't forget to add the corresponding _CD and _CL .lut files for them
cameras.ini - default is ok to start with
car.ini : car parameters.
- we should at least change the SCREEN_NAME (can be anything), as it will appear while in-game
- IMPORTANT: we don't deal with suspension animation at this point so be sure to set USE_ANIMATED_SUSPENSIONS=0
driver3d.ini : default is ok to start with
engine.ini : defines engine parameters.
- uses the lookup table:
- power.lut (mandatory)
- note: no coast.lut file is required anymore. Must keep the section in engine.ini to keep AC from crashing, but do not use for data.
lods.ini : used to improve performance (but we'll speak about it another time)
- edit block LOD_0, and put your .kn5 file name
- since we don't have any other LODs at this moment, we delete all other blocks LOD_1, 2, etc
suspensions.ini : suspension type and data
- modified wheelbase to 1.9m and CG to 0.3 to match more or less our little 3d model (visual reasons).
- NOTE: this indicates the car's CG so a better suited value to start with is 0.5 (50%front)
tyres.ini : define tyres parameters.
- uses lookup tables for both wear and temperature. Depending on the type of tyre you wish to use, corresponding *.lut file must be added. In this case:
F3hard_front.lut
F3hard_rear.lut
tcurve_F3hard.lut
etc.
All the parameters (e.g. heating) are in the tyres.ini under [THERMAL_FRONT] and [THERMAL_REAR]. Supposing you would like to modify tyre overheating and temperatures, you would play with:
friction_k value is heat generated by lateral sliding
rolling_k value is heat generated by rolling driving straight.
You would first need to determine when are your tyres overheating. And than play around with the values. Small adjustments and not both parameters at same time, ie; if you're overheating while cornering than adjust friction_k etc.
final.rto, ratios.rto
These can be deleted, they are used for cars with multiple gear ratio options (as it's the case for formula_k). The setup.ini will refer to this, so if you do remove them, then make sure to amend that too (just delete the relevant section).
OPTIONAL, BUT MANDATORY (car should load, but behave weird)
brakes.ini : brake parameters
- car will load in-game, but.. you'll have no brakes (this is the way James Bond's car would be sabotaged in Assetto Corsa, for example)
colliders.ini : defines collision behavior for bottom of the car (car bottom touching the ground). This should come as an addition to the collider we already have (that handles all other body collisions).
drivetrain.ini : drivetrain parameters
- car will/should load, but you can't engage any gear.
setup.ini : used to define all the available option user has in garage
- car will/should load, but when you hit drive, game could crash.
At this point, your data folder should look like this:
..aaaand you should have a complete working car ! GO DRIVE THIS BEAST !
***
When you want more, you'll notice the presence of a sub-folder named FOR_LATER_USE. That one contains all the files that are optional at this phase (meaning your first drive), but should be defined and moved to data folder for the final car. A few words on them:
throttle.lut : This controls your throttle map (though very simple, just a 0-100% input versus output). This will have a perfect linear throttle, you can tweak it later:
0|0
100|100
100|100
ai.ini : AI parameters
ambient_shadows.ini : defines size of car shadows
analog_instruments.ini : controls analog dash instruments
blurred_objects.ini : when you will wish to include blurred rims on your car, you will need this file.
- do NOT forget it later
digital_instruments.ini : controls digital instrumentation incar
Just a reminder to always delete the contents of this at a start of a new project, always causes crashes as its looking for a dummy that is likely not there on your model. /gary
damage.ini : controls visual damage level
dash_cam.ini :
electronics.ini : controls electronic driving aids car might have
escmode.ini : controls the orbiting camera you sometimes see in the pits, the height/distance it is away from the car. /gary
flame_presets.ini : very detailed info about exhaust flame phases, never messed with this before. /gary
flames.ini : this is the simple controls for exhaust flames, used to control the position and direction. Tip - open the console (press Home), enter "set observeFlames 1" (case sensitive) and you can see the flames and can edit them realtime. /gary
lights.ini : different light parameters
mirrors.ini : mirror parameters
- important when you'll include mirrors
sounds.ini : sound parameters (e.g. engine position). Without it, probably defaults to some standard sound configuration (?)
suspension_graphics.ini : Genuinely have no idea what this is for, never used it/seen it used for any car even those with animated suspension. Just leave it blank. /gary
wing_animations.ini : animated wings
NOT REQUIRED (delete/ignore)
proview_nodes.ini - delete. Will be automatically created.
coast.lut (obsolete)
FINAL NOTES
If you change the name of a folder/car, you need to check 3 things:
- name of folder and name of kn5 file are identical
- edit lods.ini and change the name of the kn5 to be used
- change bank file (and GUIDs if the case)
This is really a BASIC guide. It's meant to get your first creation moving. Once you understand how it works, the rest is just a matter of adding additional dummies to different car parts. Although, some additional guides should surface this forum, don't hesitate to consult the pipeline doc. NOW, it will be more relevant since you know the link between different components of a complete mod car.
Happy modding
.PS:
I have attached the complete folder for the above project. It only misses the bank file, due to its size. If you want to run it in-game, you just need to copy the bank file from the cobra and rename it to acm_tutorial_basic.bank (the GUIDs is already prepared for this car). Why this car ? It had the smallest bank file
.PPS: the sample car will run in-game. But not in Showroom (which requires additional dummies).
Attachments
-
1.4 MB Views: 6,005
Last edited by a moderator:

