RELEASED-final Pinwheel Circuit

Discussion in 'Tracks' started by John Harding, Aug 11, 2021.

  1. Corracar

    Corracar New Member

    Joined:
    Oct 4, 2020
    Messages:
    3
    Likes Received:
    1
    I know how much work and time is needed to do a new track, because me too I'm working on a fantasy track, now I'm trying to improve its graphics quality (quite poor at the moment).
    I think your track is wonderful! You did a great job on textures, mesh, layout, shading...and everything! Now I'm downloading it!
     
    John Harding likes this.
  2. John Harding

    John Harding Active Member

    Joined:
    Aug 5, 2021
    Messages:
    68
    Likes Received:
    127
    February Update
    So at the end of December I decided to release 0.2.0 on Racedepartment. Just getting it out there was a relief to be perfectly honest, anyone that has made a track from scratch can appreciate this. Every mesh here has been made from scratch and it takes so long to do! I have to admit the sense of achievement is there regardless of the standard of the thing, it’s always pleasing to create something and then share it with others, no matter what it is you are doing. I could have waited until it was more complete for a public outing, however the feedback from 0.2 has helped focus the direction of the project. Some things I have been working on this month…

    Texture: Details
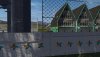
    My goal has always been to have no Kunos textures, almost there now! Firstly I visited my ‘local road barrier’ resource, took some pictures and have adapted into the game using a suitably profiled mesh. Quite happy with the result, adding a little nodal jiggle in grasshopper avoids things looking too smooth and gives a more natural feel. Details such as the Armco ends and cones are also now done. This is all visual of course, the physical mesh is now hidden away. My advice to anyone making a track from scratch is that setting up a basic Armco/wall to start with can still be useful later down the line to become the physical barrier later, with a more detailed mesh being (visual only) added later. There are improvements to be made still overall, the top cable between the posts is quite characterless, and some of the fence connections need detailing properly but otherwise I think this is getting to a good enough place.

    [​IMG]
    Figure: Armco ends on the Zumthor Straight.

    Details such as the white lines on the grid, extra numbers, converting pylons to be trussed, etc. have all been completed during January. Slowly getting there. Unfortunately it looks like I need to keep to 26 pit boxes @JrC because of the problem of the cross-over track spawn points that couldn’t be resolved (so no more slots going back on the grid at least) and I can’t move the grid any further forward due to the run down to the first corner. Bit of a shame but 26 isn't too bad.

    [​IMG]
    Figure: Grid number detail + white line improvement.

    Textures: Trees and Greenery
    GrassFX has been modified with new textures and setup to incorporate some longer grasses around the infield. By sliding the landscape mesh out under the Armco slightly in places, long tufts of grass appear sometimes just in front of the Armco which gives a little roughness to the feel of the track. Also no more Kunos trees thankfully thanks to the advice I received on this thread (thanks everyone). In the end I went for some trees from the Meye collection thanks to @JrC, spending absolutely ages trying to find a good blend for certain sections of the track. Lots of trial and error, but getting somewhere finally, with relatively low ambient and diffuse levels (0.1 ish) this seems to work quite well in pretty much all conditions.

    [​IMG]
    Figure: Long grass peeping through.

    [​IMG]
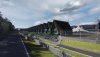
    Figure: Wild grasses with bridge and Hyperboloid observation tower in the background.

    Textures: People
    One of the main things on the todo list has begun, adding people and characters to the track itself. Firstly some relatively low poly 3d marshals were made using the Autodesk character builder. The textures were then modified based on some photographs from the 2017 British GP. They could be better, perhaps with some movement but I think when I get round to modelling the camera men/women they may be updated. There are some good tips on this forum in this area for sure.

    In terms of the crowd, after a little experimentation I ended up opting for the camera facing set (I know there are debates around this), also because a) they keep the DIP low, b) the standard standing and seating texture can be easily updated in future, c) they seem to work quite well, and the adaptive crowd size in CSP is good to integrate with. The figure below shows how this is done which is relatively straightforward, just a mesh strip located just above the floor below the seats (remembering to turn the object render to false in KsEditor), then add the camera_facing.ini to the data folder, something similar to this thanks again to @luchian 's guide for some sensible values (the 'elements' is set proportionate to the surface area of your mesh strip):

    [CAMERA_FACING_1]
    SURFACE=CamFacing02
    ELEMENTS=400
    SIZE=0.8,1.5
    TEXTURE=content/texture/people_sit.dds
    TEXTURE_ROWS=3
    TEXTURE_COLUMNS=7
    SHADED=1
    DIFFUSE=0.022,0.022,0.022
    AMBIENT=0.075,0.075,0.075

    [​IMG]
    Figure: Showing people strips in Rhino and image: “Why are you all looking at me and why are your legs in the seats!?!”

    Once this is done, adding standing people is relatively straightforward by creating additional non-renderable meshes in areas such as the pits and infield sections and referencing the standard people set in the AC installation. Again, in time this will need to be updated.

    AI
    Updating the AI line has been on the todo list for a while, however I put it off because of the implications of messing up everything else (cameras, sounds, corner names, etc.). Anyway, I took the plunge and can highly recommend using the Tatuus when recording an AI line, just because it is so stable and smoothness of the spline is everything. That combined with some brand new AI hints, and the cars are lapping nigh on 3-4 seconds quicker and on par with my record times around the track. This is a complete game changer on the track when running in races, as they no longer back off at odd places destroying your front wing! They can also negotiate areas such as the sausage kerb and not fly into the air.

    Future modders take note: one of the problems with a cross-over track is that after recording, you have to go around in KsEditor and correct the edge spline at those locations manually (changing the sides0 and sides1 values) which is really time consuming. Just to note, I found it very useful to resample the Spline from around 3600 to 1800 points (sample dm 30) before editing the values as it takes so long to do. The resulting spline is absolutely fine at that resolution for this length of track. Of course with a new Racing line, a new pit line had to be recorded as all the values along the original curve and where it meets with the racing line are wrong. Also remember to split your mesh so that the lower and upper sections are different meshes, otherwise the AI will go crazy.

    [​IMG]
    Figure: The problem with a cross-over track – outer splines go crazy and must be edited manually.

    Some Other bits:
    Some other minorish things that have happened since the December update:
    • A couple of spline cams now integrated, thank you @Sam Dale for your help!
    • DRS Zones are now implemented and new PObjects/boards.
    • Corners now named, based on my favourite architects!
    • A few camera towers.
    • Penalties now implemented just with little do not cut strips (see image below).
    Finally, there is a new slight dip in the track on the second straight, just giving a little more elevation change as things were too flat. For anyone that uses Rhino, I used the Cageedit command for this just to morph the area which kind of worked after a lot of post-production!

    [​IMG]
    Figure: Implementing a penalty ‘line’ on the inside of the hairpin with a simple non-renderable mesh quad.

    Next Steps:
    The aim now is to release 0.3 on Racedepartment in a couple of weeks with the above updates implemented. Maybe some of the following things on my todo list will make this release, not entirely sure it depends on how much ‘real work’ I have to in the meantime. If anyone has any questions at all and starting out modding let me know and also if you need any textures.

    Todo this month:
    • More lights on bridge, grandstands, etc.
    • Team crews in the pits.
    • Better details on the kerbs, they are too monotonous around the track.
    • Railings and detail all over the place.
    • More adverts.
    • Working clock (maybe)!
     
    Mitch9, luchian, Sam Dale and 4 others like this.
  3. Mr Whippy

    Mr Whippy Active Member

    Joined:
    Jan 18, 2016
    Messages:
    199
    Likes Received:
    142
    Looking amazing!

    I love your initial non-destructive node based type layout method.

    For creative style fictional tracks that’s a really clever way to work because you often need to test to make sure your ideas drive well, and then iterate quickly!
     
    John Harding likes this.
  4. luchian

    luchian Administrator Staff Member

    Joined:
    Jun 3, 2014
    Messages:
    3,007
    Likes Received:
    1,491
    Oooo, it's update time. Did I mention I love to read these? :D
    Hey @Prototype, if you still visit these forums, I think you'd like to read this thread :).

    Keep going John, looking great (& very nice color palette).
     
    John Harding likes this.
  5. John Harding

    John Harding Active Member

    Joined:
    Aug 5, 2021
    Messages:
    68
    Likes Received:
    127
    Got my clock going based on a Swiss Train Station design. Thought I would share this here, because I spent quite a few hours trying to work out what was not working with the second hand.
    Turns out on the CSP Wiki page here you need to use 'SECONDS' and not 'SECOND' as instructed, that's all it was! I probably should let Ilya know to update the wiki.

    No ksanim file is required for this which helps, indeed the ext_congfig.ini addition is pretty simple:

    [ANIMATED_...]
    NODE = SecondHand
    CLOCK_NEEDLE = SECONDS
    SPIN_AXIS = -1, 0, 0

    [ANIMATED_...]
    NODE = MinuteHand
    CLOCK_NEEDLE = MINUTE
    SPIN_AXIS = -1, 0, 0

    [ANIMATED_...]
    NODE = HourHand
    CLOCK_NEEDLE = HOUR
    SPIN_AXIS = -1, 0, 0
    [​IMG]

    The clock is currently floating in space, it may need some structural support! If anyone wants the clock for their own project in the future let me know, happy to share.

    John.
     
    JavireTwo, luchian, maruto and 2 others like this.
  6. John Harding

    John Harding Active Member

    Joined:
    Aug 5, 2021
    Messages:
    68
    Likes Received:
    127
    I really should focus on the kerbs, but having far too much fun with these animations. I must find some self-discipline!

    [​IMG]
     
    quetillo, maruto, Sam Dale and 3 others like this.
  7. John Harding

    John Harding Active Member

    Joined:
    Aug 5, 2021
    Messages:
    68
    Likes Received:
    127
    March 2022 Update
    I have to admit with everything going on in the world it’s been a little difficult to motivate myself to keep going with this track at times. I plough on though… during the evenings after work, occasionally I can use this as some sort of personal escape - almost like building a model train set in the loft or something similar I guess… perhaps this is what happens when you get past 40? Anyway, I keep resisting the urge to recapture that early spirit and enjoyment when creating a new layout in order to progress the details further, although for how much longer I can continue I am not sure! Well, it’s early March and about to release version 0.3, all being well tomorrow on RD. Some things that I have been working on since my last summary post in January.

    [​IMG]

    Crews

    One of the main things to learn was how to handle the naming for the meshes for the crew elements and also use the correct texture. As those that have been doing this for years know, the trick is to use the ac_crew.dds texture which then gets updated for all teams for things like roofs, signage, etc. as described on this forum. I also mapped things like some tapered steel beams to a small portion of this texture so that they would show up in team colours, as well as a little moving ‘pinwheel’ for each team which you can just make out in the image below, bottom left. Next step is to maybe implement some opened garage doors as described by @Gunnar333 here: https://assettocorsamods.net/threads/hide-ac_crew-objects.2110/#post-15831

    One thing that I would recommend doing (that I didn’t do) is to just to set up one additional texture for all the other stuff like Kunos do… i.e. tyres, rack, pipework, cones, etc. so that all these things can be joined into a single mesh. Instead, I have 5-6 different meshes for each team (each using textures I already have in the track), which when towards 26 teams are present will have a slight performance cost, however we’re not talking millions of meshes and once I realised the error of my ways it was a little too late so I decided I will just live with it (DIP is still around 1200 near them when full, and I still get 100fps on my crap machine so I’m kind of ok with it). You can see in the example below, with the AC_CREW_X_TYRES and AC_CREW_X_RIMS as separate meshes. As well as maybe fixing this, looking at the image I am reminded that I need to add some tyre marks out of the pit boxes:

    [​IMG]

    Kerbs
    A painstaking task I had been putting off for a while was to update the physical mesh for the kerbs to better reflect the visual kerbs and give a better feel when riding them (also thanks to feedback from Sam). The track has pretty flat kerbs which I actually find quite fun in the main, so making kerb feedback rather subtle whilst still disrupting the balance when riding them too much took a lot of trial and error. In the end the physical mesh is raised up and down between 0 and 50mm in various places, with some extra small ellipsoid-like bumps (or ‘dissuaders’ if you like) that do just enough to disrupt the balance of the single seaters without being overly ridiculous, kind of inviting them to be cut if you see what I mean. This is something I will keep tweaking though after seeing how people find it.

    [​IMG]

    Trackside Objects
    Quite a few new things made during January. The clocks and roller coaster (see posts above for how they are done), camera towers, display stands (still need to do the actual displays), new birch trees, some houses next to the track that I would like to own (if I could afford it), a Henry Moore sculpture (just because) and a hidden pinwheel somewhere on the track. Overall there is not much else to report here other than I don’t want to keep adding too many more things trackside, I think the place is populated enough now and it’s just a case of refining things and improving details. For example, changing a couple of the granstands to add variety and adding one or two more sponsors without going overboard. I do have a bit of a thing for the BT55 livery so there might be one or two olivetti boards popping up here and there:

    [​IMG]

    Next Steps
    Seating and fans are working fine as per the January post but need a little refinement before the next release for sure, and as mentioned a replacement grandstand. Perhaps revisit Grass_FX and make some improvements to the trackside grass. Still need to add cameramen/women. Perhaps add another spline cam or two. Normal maps on the gravel need refinement for sure, but almost feels like I’m getting somewhere. The AI update has made a world of difference in terms of racing enjoyment on the track for me, so looking forward to seeing if anyone notices tomorrow when I upload 0.3.0.

    As ever, thanks everyone for your continued help and support. So pleased to have discovered this place… this time last year I didn’t even know what Assetto Corsa was :)

    John.
     
    luchian, RJL, maruto and 3 others like this.
  8. Gunnar333

    Gunnar333 Well-Known Member

    Joined:
    Aug 5, 2017
    Messages:
    321
    Likes Received:
    618
    Location:
    Germany
    The method I described there has become a bit obsolete, since Ilja has implemented animated doors in CSP now. Have a look at my Sachsenring ext_config.ini lines: 2122ff
    Also the light at the certain pitstop reacts to the active car ID (ext_config.ini lines below that).
     
    John Harding likes this.
  9. John Harding

    John Harding Active Member

    Joined:
    Aug 5, 2021
    Messages:
    68
    Likes Received:
    127
    Thanks @Gunnar333 , appreciated. I will have a look through. There's loads I can learn from your fine work on Sachsenring in addition to that... on my todo list for example is improving all the run-off areas and gravel traps, I know there is much work in that area I can learn from.

    Rather than create an additional post, just to say I've just released 0.3 on RD here. Much still to do though.

    [​IMG]
     
    luchian, maruto, Sam Dale and 2 others like this.
  10. maruto

    maruto Active Member

    Joined:
    Apr 28, 2020
    Messages:
    126
    Likes Received:
    218
    That little pinwheel animation really putted a smile on my face.


    Thanks John.
     
    luchian and John Harding like this.
  11. John Harding

    John Harding Active Member

    Joined:
    Aug 5, 2021
    Messages:
    68
    Likes Received:
    127
    April 2022 Update
    There is, of course, still work to do… however lately it has felt like being on the home stretch just a little bit more. Many of the changes are either tweaks or minor improvements, with many dead ends explored accompanied by feeling of “what was I thinking?” before returning back to an earlier saved state. The main fbx file is now far too big, but to split it up now is a bit of a faff and would increase overall file size as some shared textures would be copied twice into each kn5... so instead I am left with a 5 minute load in the editor, however that is just fine as it coincides with a decent tea brewing time. Anyway, herein lies a summary of recent activity:

    User Feedback
    Thankfully the track seems to run quite well on other machines - as mentioned before I have tried to keep poly counts low where I can and meshes also (I think there are around 750 meshes in total including crew). This has been achieved by always looking at the render stats and keeping the DIP to around the 1200-1500 mark maximum when running alone and from a nose camera view (otherwise the cars start to influence this value). Things could still be optimised in terms of level of detail including low poly duplicates for distance viewing, however quite honestly I don’t really have the motivation at the moment seen as things are not too bad at present. Maybe that will change before 1.0 is released however.

    Trackside Objects
    The addition of a landscape wrap changes the feel of the circuit hugely and the sense of being within a place. I found a suitable landscape image with a CC licence and following some editing to create a seamless wrap, which sits around about double the radius of the track with a simple AT Shader. Just lowering the contrast a little from the original helped with giving a better sense of depth of field.

    [​IMG]
    Landscape wrap image. The gaps from the foreground mesh are never seen.

    Some other edits of note where most time has been spent include the fence posts, chainlink and turnbuckles which have had a complete overhaul, as well details such as pylon cables. As mentioned, one thing that I always have in mind is always have in mind how you are making the meshes, especially with something you are going to repeat everywhere. For example, for most simple objects I will make the meshes from scratch rather than rely on a meshing algorithm from a solid object. Again, using Rhino I expect this might be slightly different in Blender but having that mindset for objects that are going to be repeated seems to be sound advice.

    [​IMG]
    New I-beam fence posts and pylon cables with spacers.

    The grandstand at turn 1 is now updated to have a temporary frame, again as low poly as I can get, with double sided zero-thickness quads. There are 1624 tris in total in the frame, most of which may never be seen but you never know. There are a few things that need to be improved here, namely an access stair for this particular stand and also just periphery buildings, food stalls, vans, etc. around these grandstands.

    [​IMG]
    Striving for low-polys in the new grandstand. It could be more detailed.

    Working Displays
    Following the tutorial on the wiki has made this quite simple. As a starting point it is possible just to use the camera positions already set up in the data folder (assuming you have some). Just make sure to set your mesh aspect ratio to be the same as the one in the config file. I turned off the high refresh rate just for performance reasons, so the display is showing the view from the camera at 15fps. There are three locations with displays, each opposite one of the main grandstands.

    [​IMG]
    [​IMG]
    Displays made following Ilya's excellent wiki, link above.

    Pits
    Roof textures improved following feedback from RD, more pit lights to better illuminate the place at night as well as pit entry lights, clock faces now show on both sides which took absolutely for some reason to get the orientation correct (again if anyone needs a clock then please let me know!). Other textures updated with normal maps such as the pitwall – these are made by using the auto normal map generator in Photoshop and then adjusting the contrast of this image. Still not implemented movable garages (see above), but definitely on the todo list. Still hoping to have some fun with dynamic textures too at some point before 1.0.

    [​IMG]
    Double sided clocks.

    [​IMG]
    Please, come pit. We know you want to...

    [​IMG]
    Dieter Rams Radio - just left lying around.

    A second set of starting lights now exists halfway down the grid. This is made possible by joining pairs of meshes and naming them KS_START_LIGHT_0, KS_START_LIGHT_1, etc.. You can see in the image below which is a single disjointed mesh containing both of the first start light. I'm not sure entirely if this is the only way to do it, however having two meshes named correctly only results in one of them firing up - hence joining.
    [​IMG]
    Two sets of start lights, with paired up meshes for each of the 5 lights.

    [​IMG]
    Main starting lights under the truss.


    Other bits
    Rollercoaster now slows at the right place instead of underground. More tyre marks on kerbs and in the pits and some new speed bumps to avoid cutting areas such as the Corb kink. More people on the infield in places around the track, this is done by making some very low poly meshes and setting isRenderable to false in the editor then referencing them within the camera_facing.ini file as shown below (note how these people are 2 metres high just to make them a little more noticeable).

    [CAMERA_FACING_22]
    SURFACE=StandFacing10 ;the mesh name
    ELEMENTS=12 ;people in the mesh with a full crowd
    SIZE=0.7,2.0
    TEXTURE=content/texture/people_stand.dds ;standard people texture, to be updated.
    TEXTURE_ROWS=2
    TEXTURE_COLUMNS=11
    SHADED=1
    DIFFUSE=0.022,0.022,0.022
    AMBIENT=0.075,0.075,0.075

    [​IMG]
    Can you see the two metre high people?!

    [​IMG]
    Soft suspension now required should you wish to cut the Corb Kink.

    Where to go next?
    I think that will be enough for a 0.4 release, and then I might have a bit of a break for a month or so. To be quite honest, I’m not enjoying it as much as I once was and maybe a break will reinvigorate my brain before a final push in the summer to get things really completed. Aspects such as flags and the sand traps need some work (for the latter, I’ve been experimenting quite a bit without success as yet) as mentioned above with regards gunnar's inspirational Sachsenring. It will probably involve remeshing as some early experiments with the multilayer shaders did not quite work out, but as I say I need a break before giving it another go. So my aim is to take roughly a year to complete the track, so should still be ok to do it.

    Happy Easter everyone.

    John.
     
    luchian, RJL, maruto and 1 other person like this.
  12. Johnr777

    Johnr777 Moderator

    Joined:
    Jul 26, 2017
    Messages:
    1,048
    Likes Received:
    613
    Hi John, this is John

    FYI, you can add a condition instead of a value to one these parameters, allowing the screen to get brighter in low light / night time:

    eg.: OUTPUT_GAMMA = condition
     
    John Harding likes this.
  13. John Harding

    John Harding Active Member

    Joined:
    Aug 5, 2021
    Messages:
    68
    Likes Received:
    127
    Thanks @Johnr777 , although I have to admit to being a bit perplexed as to how to do this! How do I go about creating a condition that switches between two values, so that the Output_Gamma changes depending on say the sun angle? Sometimes I think I understand conditions, but then I'm not so sure.

    So far I've tried just performing a material adjustment on the display texture (increasing ksEmissive for when NIGHT_SMOOTH) but the results are not that great. Would be good to have control over those parameters as you mention, I'm just a bit flummoxed. Can't seem to find an example on the repository.
     
  14. Johnr777

    Johnr777 Moderator

    Joined:
    Jul 26, 2017
    Messages:
    1,048
    Likes Received:
    613
    Here's the way I messed with my Road Atlanta TV screens, I created a condition based on SUN angle, then.. sorry, I didnt use gamma, but brightness instead. Hope this helps!

    Code:
    [CONDITION_...]
    ACTIVE=1
    NAME=DigScreens
    INPUT = SUN
    LUT = (|0=1.0|88=1.0|89=1.5|180=1.5|)
    LAG = 0.97
    
    [Material_DigitalScreen]
    Materials = TV_Display
    MatrixType = IPS
    UseTextureCoordinates = 1
    ScreenScale = 512
    Emissive = 2
    
    [DISPLAY_...]
    MESHES = tv_display
    REGION_START = 0, 0   ; display position on texture, in pixels
    REGION_SIZE = 512, 512   ; display size on texture, in pixels
    ; Update and rendering options
    HIGH_REFRESH_RATE = 0    ; high refresh rate (enabled by default; 30 FPS with this option on, 15 FPS without)
    FLIP_X = 1               ; change to 1 to flip output on X axis (mainly for strange UV mapping)
    FLIP_Y = 1               ; change to 1 to flip output on Y axis (mainly for strange UV mapping)
    ; Color corrections:
    OUTPUT_ALPHA = 0         ; alpha channel value for display area
    OUTPUT_GAMMA = 0.55      ; gamma correction, reduce to make darker areas even darker
    OUTPUT_SATURATION = 1.0  ; saturation correction
    OUTPUT_BRIGHTNESS = DigScreens  ; brightness correction
    OUTPUT_FISH_EYE = 0.0    ; increase to add lens distortion effect
    OUTPUT_VIGNETTE = 0.0    ; increase to darken corners
    OUTPUT_CHROMATIC_ABERRATION = 0.0 ; increase to add that nasty chromatic aberration
    MODE = CAMERA
    
    CAMERA_0 = -496.846130,-15.432868,900.667114         ; camera position
    CAMERA_0_TARGET = -266.56, -33.58, 706.27  ; point at which camera is looking
    CAMERA_0_UP = 0, 1, 0                      ; camera’s upwards direction, defaults to 0, 1, 0
    CAMERA_0_FOV = 20                          ; FOV angle in degress, defaults to 50
    CAMERA_0_ASPECT_RATIO = 1.752
     
    John Harding likes this.
  15. John Harding

    John Harding Active Member

    Joined:
    Aug 5, 2021
    Messages:
    68
    Likes Received:
    127
    Thank you @Johnr777 , that does indeed help... now I understand how to control conditions for other applications too so much appreciated. With full night conditions I have to tweak the brightness quite a bit, and the gamma too in order to get a half-decent display, but still some work needed to finesse this. Still, much better than a completely black display at night.

    Code:
    [CONDITION_...]
    ACTIVE=1
    NAME=ScreenGamma
    INPUT = SUN
    LUT = (|0=0.52|88=0.52|89=0.65|180=0.65|)
    
    [CONDITION_...]
    ACTIVE=1
    NAME=ScreenBrightness
    INPUT = SUN
    LUT = (|0=1.0|88=1.0|89=7.5|180=7.5|)
    
    [MATERIAL_ADJUSTMENT_...]
    ACTIVE = 1   
    MESHES= Display_A, Display_B, Display_C
    KEY_0 = ksEmissive     
    VALUE_0 = 40,40,40; r,g,b,brightness
    OFF_VALUE_0 = 20, 20, 20
    CONDITION = NIGHT_SMOOTH
     
    Gunnar333 likes this.
  16. John Harding

    John Harding Active Member

    Joined:
    Aug 5, 2021
    Messages:
    68
    Likes Received:
    127
    June 2022
    Almost one year on, and it feels as if the finish line is almost in sight. Had a mini-resurgence in motivation lately, however it was short lived and it happens less frequently of late. However, some minor bugs fixed, extra trackside objects made, tv cameras updated, etc. - but to be honest it’s all cosmetic now and not adding that much to the driving experience. I'm also driven by keeping the track playable for those with modest systems, so to be honest I don't want to add too many more meshes and textures if I can help it (only for good reason).

    The odd physical mesh tweak has been made here and there, improved flags, lights on the coasters, etc. I’m at release 0.5 pretty much and to be honest unless there are some major things to update this is probably one step away from 1.0 and then moving onto other things. Spending a year on the track on and off feels like probably enough time, especially as I’m not enjoying it quite so much and would like to maybe think about a new project (who knows what, suggestions welcome).

    Anyway, as things are coming to a close I thought it would be interesting to get a few stats on the (almost) final project as a whole, just in case this proves to be an interesting comparison to other tracks:

    • 1026 individual meshes (with a full 26 pit crew, no trees).
    • 673 meshes (no pit crews, no trees).
    • 4164 tree meshes.
    • 80mb approx. on all the meshes themselves.
    • 2,337,000 Vertices in total (with a full 26 pit crew).
    • 978,000 Tris (under a million seems like an achievement for some reason).
    • 270mb in total for all the kn5s (relatively low I think).
    • 102 textures (this includes normal maps), totalling 150mb.
    • DIP: Usually around 1200 on a hotlap, min around 600 and max around 2000 adjacent to the pit area.

    [​IMG]
    Extent of the mesh

    [​IMG]
    Mesh detail showing some low poly landscapes


    [​IMG]
    New wild grasses at pit entry


    [​IMG]
    Medical Centre


    [​IMG]
    Lots more galvanised steel :)


    [​IMG]
    New flags - not perfect, but better. Grouped into 2 meshes to have differing ksFlag frequencies


    [​IMG]
    Pinwheel City at night

    As always, thank you to the community for all the help. This will probably be the penultimate post, then will end with a conclusion at some point before 1.0 is released!

    Best wishes,

    John.
     
    luchian, RJL, Sam Dale and 2 others like this.
  17. Ariel Suraniti

    Ariel Suraniti Member

    Joined:
    May 2, 2020
    Messages:
    73
    Likes Received:
    6
    congrats !!! Look amazing. What a job.
     
    John Harding likes this.
  18. luchian

    luchian Administrator Staff Member

    Joined:
    Jun 3, 2014
    Messages:
    3,007
    Likes Received:
    1,491
    I've said it many times, I love to read this kind of updates. Lots great info, and a glimpse into the process of making a track. On a very unrelated note, may I ask what you do IRL John? :nerd:
     
    fughettaboutit likes this.
  19. John Harding

    John Harding Active Member

    Joined:
    Aug 5, 2021
    Messages:
    68
    Likes Received:
    127
    Hello @luchian. Actually your question is not unrelated at all. I trained as an architect and engineer originally and now I mostly teach rather than practice; although I will probably return to industry full time at some point. So this is why I learnt to use Rhino instead of Blender. I actually spent a lot of my early career designing footbridges, which I guess is why there are quite a few in pinwheel. This probably explains why I enjoy creating something from scratch more than recreating something that exists or once existed (like the majority of modders). I get a certain buzz from just coming up with ideas and testing them out, always have done since I can remember - like most of us I used to draw out fantasy circuit layouts as a child, sometimes testing them out with scalextric! I only recently got into sim racing (like many during the pandemic), and soon after came across the site here and the tutorial. Then I got hooked on creating a new place with its own unique identity and with every mesh bespoke, so thank you again for providing the seeds to get started - they really are invaluable. I hope I can give something back to the community here, although the Rhino people are quite niche! Hopefully some of this also translates to Blender. John.
     
  20. luchian

    luchian Administrator Staff Member

    Joined:
    Jun 3, 2014
    Messages:
    3,007
    Likes Received:
    1,491
    I - love - it! :)

    Hope to see more stuff from you whenever that might be, because it's fantastic work and a great add to the "scene". In the meantime, good luck with all your endeavors and thank you.
     
    John Harding and RJL like this.
  1. This site uses cookies to help personalise content, tailor your experience and to keep you logged in if you register.
    By continuing to use this site, you are consenting to our use of cookies.
    Dismiss Notice